

Shabby Vintage 2014 Desktop Calendar DT Project
So proud to introduce my very first DT with Miriam's Crafting
Supplies, a 2014 Desktop Calendar
PDF
Materials needed:
5 12x12 pieces of thin chipboard
1 12x12 piece of heavy or think chipboard
4 12x12 designer paper of your choice
2 book dining rings small to medium size
Any metal embellishments desired
Calendar pages (each month must be cut at
4.75x3.5, then cut them with the
Tools needed:
Paper trimmer, scissors, liquid glue, ATG glue
gun, score tape at ¼, ½ wide, ruler, whole puncher, baroque die cut by Tim
Holtz) Distress Ink (vintage photo) by Tim Holtz and 1 applicator
Cut in the following format:
Cut 1 piece at 9x6.5 out of the thin chipboard
(this one is for the bottom of the project)
Cut 2 pieces at 9x6.5 out of the thick chipboard
(these ones are for the bottom of the project)
Cut 1 piece at 9.5x9 (this one is the piece
holding the calendar pages) this piece will be score on the follow way: on the
9.5 side of the chipboard, score at .5”, 4.75” & 9”
Cut 12 pieces of the “Baroque” die cut by Tim
Holtz, also from the thin chipboard (this ones are the calendar pages)
Cut the 12 pieces of the calendar with “Baroque”
die cut by Tim Holtz, also from the thin chipboard (this ones are the calendar
pages covers)
Directions: See Video Link
Products use in this project form Miriam’s
Crafting Supplies:
http://www.miriamscraftingblog.com/dt-call.html
Bronze tone flower embellishment $.15
Metal leaf embellishment $.08
12.5mm flower look bling buttons $1.00
#5 Manila Shipping Tags
1 yard of 5/8" double faced satin ribbon
$.20
Link to the digital calendar:https://www.etsy.com/listing/167237258/instant-download-digital-collage-sheets?ref=shop_home_feat
http://www.youtube.com/watch?v=qRfPZ6dCI6c
So proud to introduce my very first DT with Miriam's Crafting Supplies, a 2014 Desktop Calendar
Materials needed:
5 12x12 pieces of thin chipboard
1 12x12 piece of heavy or think chipboard
4 12x12 designer paper of your choice
2 book dining rings small to medium size
Any metal embellishments desired
Calendar pages (each month must be cut at 4.75x3.5, then cut them with the
Tools needed:
Paper trimmer, scissors, liquid glue, ATG glue gun, score tape at ¼, ½ wide, ruler, whole puncher, baroque die cut by Tim Holtz) Distress Ink (vintage photo) by Tim Holtz and 1 applicator
Cut in the following format:
Cut 1 piece at 9x6.5 out of the thin chipboard (this one is for the bottom of the project)
Cut 2 pieces at 9x6.5 out of the thick chipboard (these ones are for the bottom of the project)
Cut 1 piece at 9.5x9 (this one is the piece holding the calendar pages) this piece will be score on the follow way: on the 9.5 side of the chipboard, score at .5”, 4.75” & 9”
Cut 12 pieces of the “Baroque” die cut by Tim Holtz, also from the thin chipboard (this ones are the calendar pages)
Cut the 12 pieces of the calendar with “Baroque” die cut by Tim Holtz, also from the thin chipboard (this ones are the calendar pages covers)
Directions: See Video Link
Products use in this project form Miriam’s Crafting Supplies:
http://www.miriamscraftingblog.com/dt-call.html
Bronze tone flower embellishment $.15
Metal leaf embellishment $.08
12.5mm flower look bling buttons $1.00
#5 Manila Shipping Tags
1 yard of 5/8" double faced satin ribbon $.20
Link to the digital calendar:https://www.etsy.com/listing/167237258/instant-download-digital-collage-sheets?ref=shop_home_feat
http://www.youtube.com/watch?v=qRfPZ6dCI6c
Costume Made Envelops from large to small

Large Size Envelope


fold all your score lines, cut and round all corners

At this point you can do some decorating with stamps or some drawing


Use the leftover corner pieces of paper to cut your round circles for the fasteners


Punch holes for fasteners and put the eyelets in place

Fold all pieces to make sure they all fit properly

Apply tape or glue to bottom flap and to side overlap flap


Close middle section and then bottom
.jpg)
Choose your cord for closing
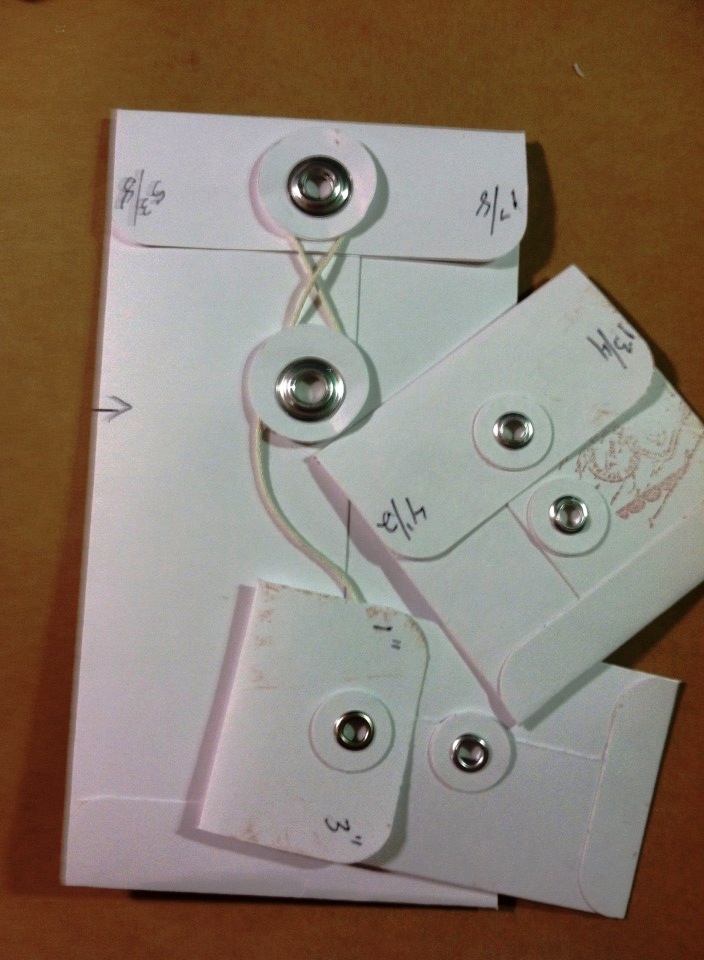
This is how they should look when you are done, good job.
Medium Size Envelop

Cut paper at 6x4.5 on the 6' side of the paper score at 13/4" then at 4.5 turn to the 4.5 side of the paper and score at 1/2" and 3 3/4" now you can follow the directions for the large envelop
Small or Mini Size Envelope

Cut paper at 5.5x41/4

Once you learn how to make this cute envelopes you will be able to make them in all sizes, enjoy

Follow the steps for the large envelop on top

Hope this was of help

Please leave a comment or ??'s
Medium Size Envelop

Small or Mini Size Envelope
 |
| Cut paper at 5.5x41/4 |
Once you learn how to make this cute envelopes you will be able to make them in all sizes, enjoy


No comments:
Post a Comment